Create a Self and Peer Assessment
The Self and Peer Assessment tool allows you to set students an assessment. This can then be assessed by themselves or their peers based on criteria that you create. Marks may be transferred to the Grade Centre.
To set up a Self and Peer Assessment follow this guide. This is a complex feature with many screens. iSolutions recommends that you do a test run first with your students before using this feature in anger, so that both you and your students become accustomed to its use.
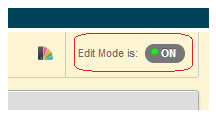
1. Check that Edit Mode is turned ON. This can be switched by clicking ON or OFF.
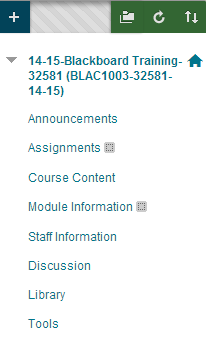
2. Choose the Content Area into which you wish to add your content. All the content areas work in the same way, if you have renamed or added content areas to your Blackboard course the screenshot above may vary from what you see.
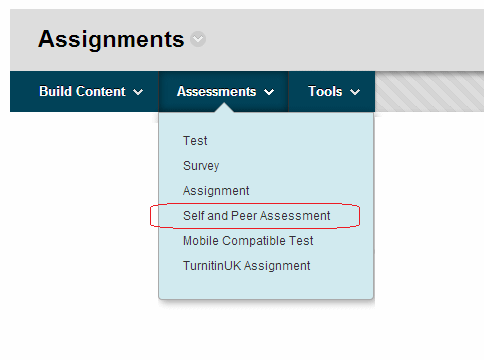
3. Hover your mouse pointer over Create Assessment and then click on Self and Peer Assessment.
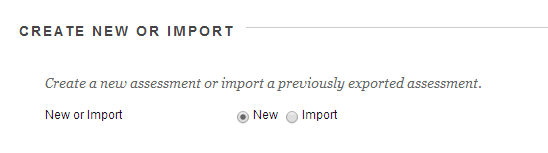
4. First you will be asked whether you wish to create a new assignment or import an existing one. Select New.
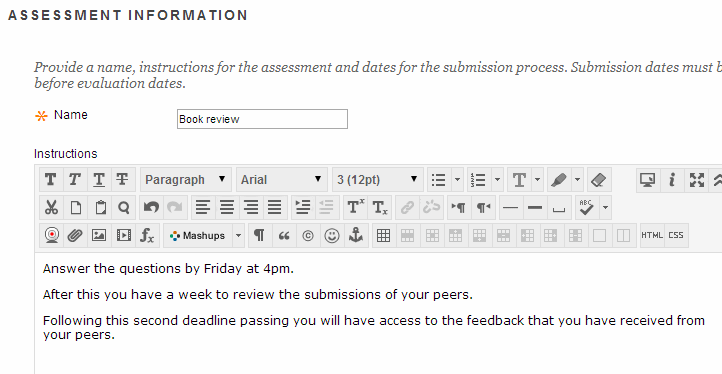
5. Enter a name and instructions for the assessment.
6. Note that you will have an opportunity to enter the questions later on in this tutorial, so be aware that you do not necessarily need to enter the specific questions in the instructions box.

7. Select the start date and end date for when students are allowed to submit their answers.
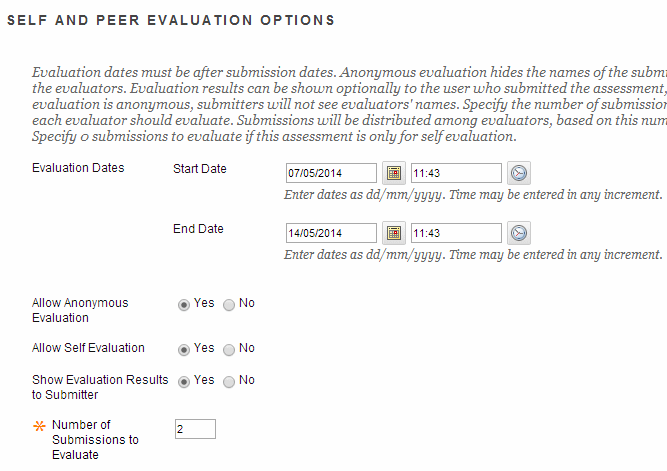
8. Select the start and end date for when students should evaluate their or each other’s answers. This should only begin after the end date set at the previous step for the submission process.
9. Set the following options according to your preferences:
Allow Anonymous Evaluation
Anonymous evaluation hides the names of the submitters and the evaluators.
Allow Self Evaluation
Selecting this option allows students to evaluate their own submissions.
Show Evaluation Results to Submitter
If you wish for evaluation results to be shown to the student who submitted the assessment select this option. If the evaluation is anonymous, submitters will not see evaluators’ names.
Number of Submissions to Evaluate
Specify the number of submissions each evaluator should evaluate. Submissions will be distributed among evaluators based on this number. Specify 0 submissions to evaluate if this assessment is only for self evaluation, having selected Allow Self Evaluation above.
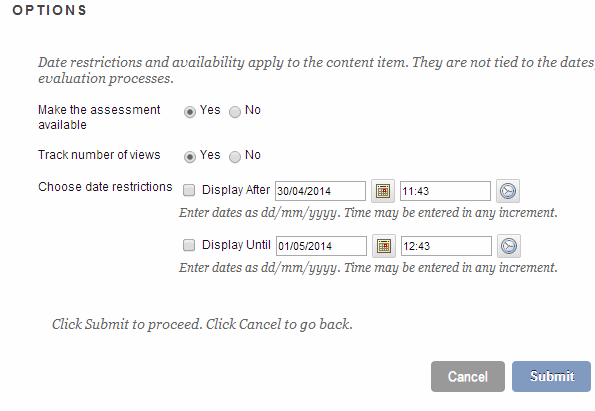
10. Set the following options according to your preferences:
Make the assessment available
If this option is set to Yes then students will be able to view the assessment.
Track number of views
If you wish to keep track of the number of times that students have viewed this assignment select Yes, otherwise select No.
Choose date restrictions
You may use this option to choose when this assessment is available to students. Note that date restrictions apply to the content item itself. They are not tied to the dates for the submission and evaluation processes which have been selected in the previous step.
11. click on Submit.
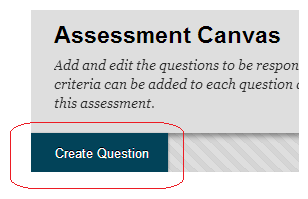
12. From the Assessment Canvas we will add each question that the student should answer, and then provide criteria by which the peer will evaluate the student’s answer. Click on Add Question.
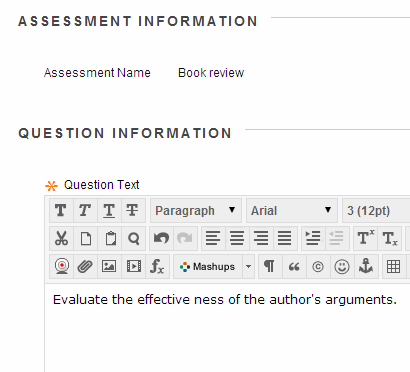
13. Enter a question which the student should answer.
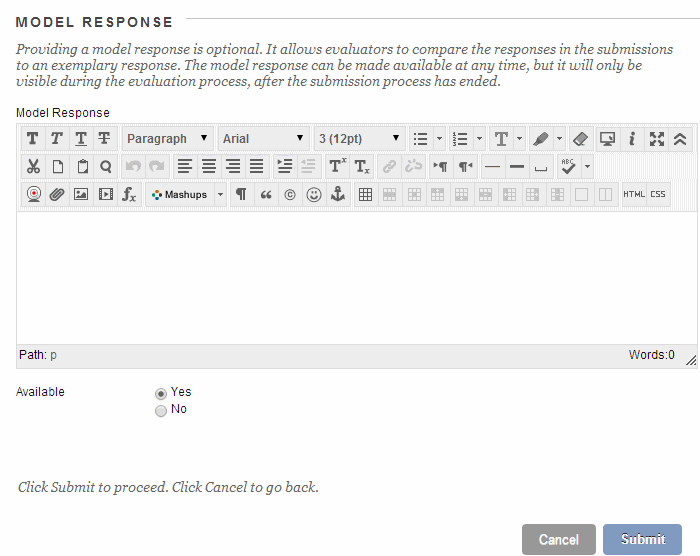
14. If you wish you may enter a Model Response. This allows evaluators to compare the responses in the submissions to an exemplary response. The model response will only be visible during the evaluation process, after the submission process has ended. To use the Model Response it must be available.
15. Click on Submit to finish and OK to continue.
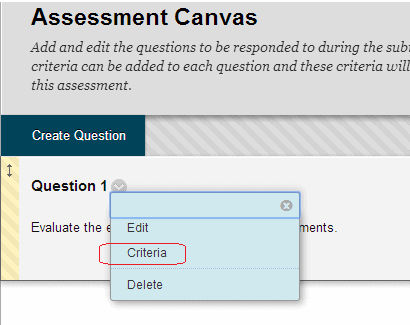
16. We must now add Criteria to the question. This is what the students will use to evaluate and assess the submission made by their peers. Click on the Modify button and select Criteria from the menu that appears.
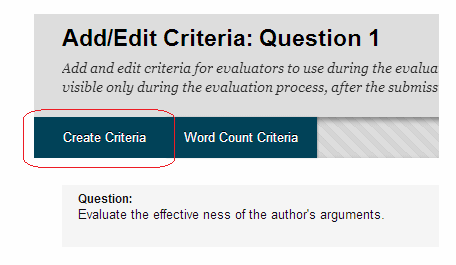
17. Here we will add criteria for evaluators to use during the evaluation process for this assessment. Criteria will only be visible during the evaluation process, after the submission process has ended. Click on Create Criteria.
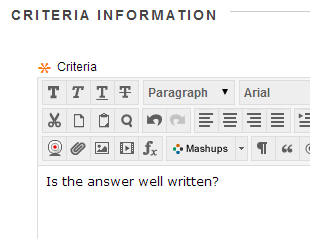
18. Enter a piece of criteria to be used during the evaluation process.
19. Choose from the following options:
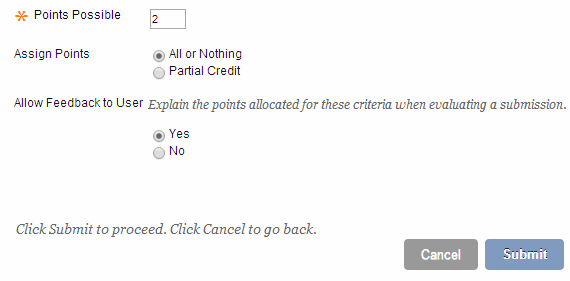
Points Possible
Enter the number of points possible to attain for fulfilling this criteria.
Assign Points
All or Nothing
Selecting this option means that the assessor can either give the maximum points or no points at all. For example if the points possible is 2 then the assessor can give 0 or 2 points.
Partial Credit
Selecting this option means that the assessor can choose how many points out of the points possible to give. For example if the points possible is 2 then the assessor can give 0, 1 or 2 points.
Allow Feedback to User
If you select this option then the peer assessor can give reasons why they are awarding the points and this information is shown to the original student who submitted the work.
20. Click on Submit to finish.
21. If you do not need to add any more criteria click on OK. If you wish to add further criteria click on Add Criteria and repeat the process from slide 13.
22. Repeat the process from slide 9 to add any further questions and their criteria. Your assessment is now ready. Please read the guide for students on how to complete the assessment, and the guide for staff on checking assessment results.
Check Self and Peer Assessment Results
You can check on the results of any Self and Peer Assessments in your course through the Control Panel. Here you will be able to view both submissions and evaluations, and if you wish transfer scores to the grade centre.
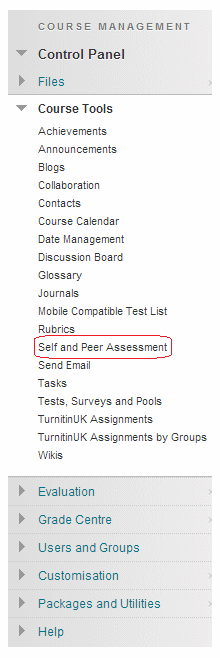
1. From your course’s Control Panel, expand the Course Tools area and click on Self and Peer Assessment.
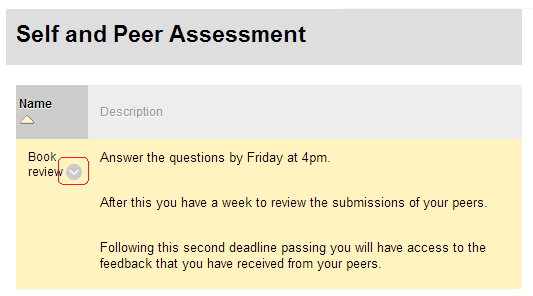
2. You will be presented with a list of any Self and Peer Assessments that have been set up within this particular Blackboard course.
3. Click on the modify button beside the relevant assignment.
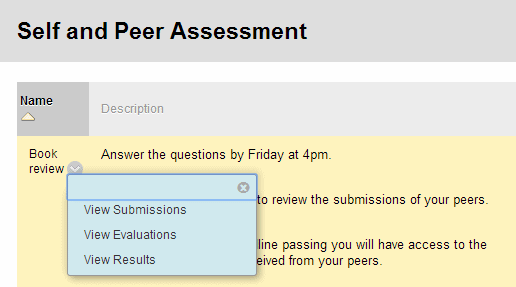
4. You are able to look at the three elements that make up the assessment.
Submissions
Clicking on this link will show you all the submissions that have been received, allowing you to download or view the submissions.
Evaluations
Clicking on this link will show you all of the evaluations performed (and by whom), allowing you to download or view the evaluations.
Results
Clicking on this link will show you all the results from the assessment, and allow you to send those results to the Grade Centre if you wish.
5. The following steps show each of these screens in order.
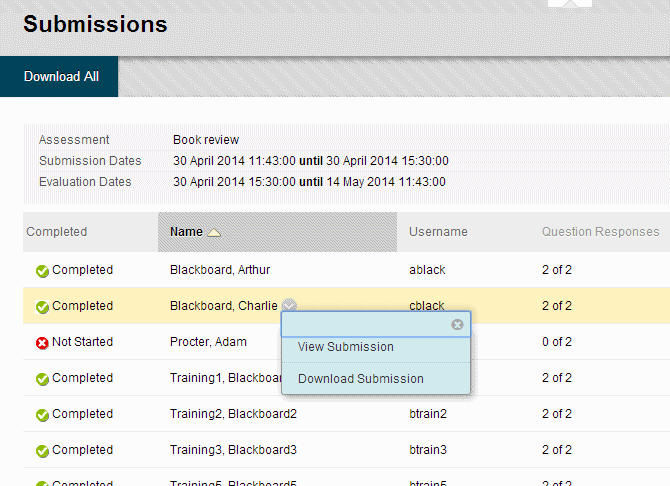
6. The Submissions screen allows you to view and download submissions. You may also download all at once.
7. The filter menu at the top allows you to view All or only Completed assignments.

The Evaluations screen focuses on the person who did the evaluating. You can see who they evaluated, including possibly themselves. If you view an evaluator you will see their evaluations for each person they evaluated, along with the submission being evaluated.
8. The Evaluations screen allows you to view and download evaluations. You may also download all at once.
9. The filter menu allows you to show all, or only completed evaluations.
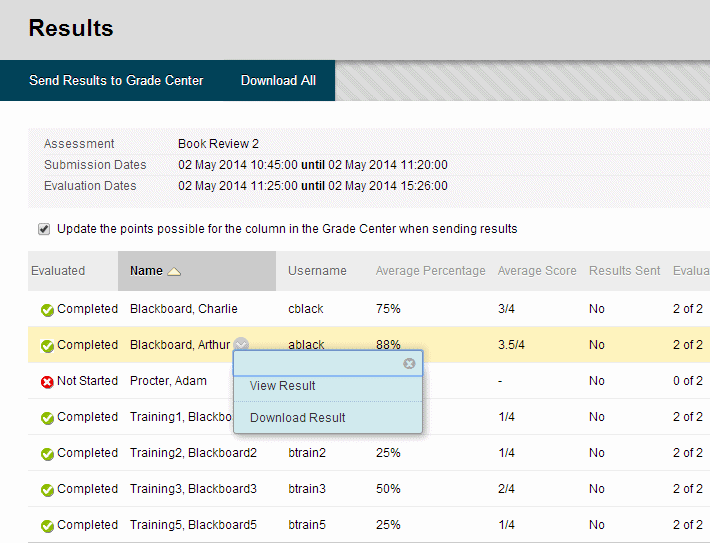
10. The Results screen shows a review of the results from the evaluations as well as giving the opportunity to view and download a brief version of the evaluations.
11. The Send Results to Grade Centre button will send the results that you see for each student to the column in the grade centre for this assessment.
12. The tick box marked “Update the points possible for the column in the Grade Center when sending results” will update the total points possible column in the grade centre to include the points possible in this assessment.