
Staff guide: Creating, managing, and marking Discussions and Journals in Blackboard Ultra.
The difference between Discussions and Journals
Discussions are open to all students or groups of students. Students can comment on the posts of others. You can allow students to post anonymously in Discussions.
Journals are private between the student and the Instructor or Maker. Other students cannot view the content of another student’s Journal.
Discussions area
All discussions created in the Course Content area will also be added to the Discussions area.
Selecting the discussion setting Display on Course Content page will show that discussion in both places.
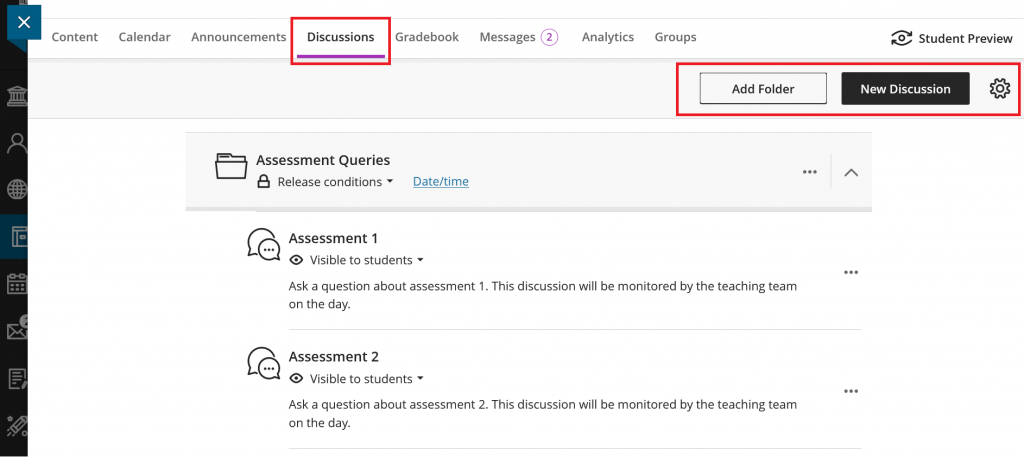
You can manage discussions by creating folders. You can add Release conditions to the folders in your Discussions area.
Allow students to create their own Discussions
- Select Discussions from the top course menu.
- Select the cog towards the top right corner to view Discussion Settings/Permissions.
- Select Allow students to create discussion topics.
Students can now create discussions in the Discussions area:
- Students cannot change any settings of their discussions; they cannot create marked or anonymous discussions.
- Students can edit the discussion topic or delete discussions that they have created.
- The author of a discussion is visible to both staff and students.
- Students cannot create folders or amend the order of discussions (even ones they created) in the Discussions area.
- Student-created discussions do not appear in Course Content.
Copy a Discussion or Journal
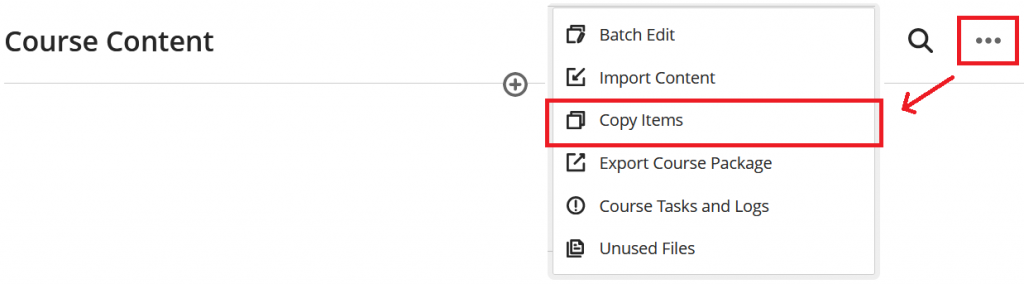
You can copy a Discussion or Journal. This will copy the initial post or description and settings, but it will not copy student participation or responses.
Copying items from the course you are currently editing will create a duplicate, which will be added to the bottom of the course content page.
Copied items are hidden from students by default.
Add a Discussion or Journal to Course Content
You can add a Discussion or Journal to the course content.
- Select (+) Create to view the Create Item menu.
- Under Participation and Engagement select Discussion or Journal.

- Give the Discussion or Journal a meaningful name.
- Add a prompt or initial post.
- This text will show as the item description without any formatting
- Discussions: Do not delete the initial post – this will delete the entire discussion.
- Select the cog in the top right to update the settings.
- Change the visbility of the item.
- Select Save.
Discussion Settings
Select the cog in the top-right to open the settings menu.
- Select Display on Course Content page to show the discussion in both Content and Discussion areas.
- Select Post first to hide discussion activity from students until they respond to the discussion.
- Select Allow anonymous responses and replies to give students the option to post anonymously. This setting cannot be applied to marked discussions and the author of an anonymous post cannot be revealed at any point.
- Select Mark discussion to treat this as a marked discussion. You can add a rubric, one or more due dates and participation requirements per due date.
- Assign to groups by creating a new group set or use an exisiting group set.
Group Discussions
- When a discussion is assigned to Groups, only students assigned to the group set can see the discussion.
- Students can only see the replies from other students in their group.
- All groups see the same discussion topic.
- Instructors or Markers reviewing a group discussion can filter the participant list by group.
Managing Discussion and Journal activity
- New activity is indicated by a blue icon.

- New posts and replies to you are highlighted as NEW.
- View a summary of student activity by selecting Student Activity (Discussions) or Participation (Journals) from the menu along the top of the page.
- Discussions: New activity is highlighted with a purple colour that will fade once you view the post.

- Discussions: There is a Participant’s menu on the right. You can use the search bar to find participants in this list. Select a student to filter the posts to only their entries. Their entries will be highlighted by a purple bar and light purple colour.
Marking a Discussion or Journal
- Marked Discussions and Journals will have a Marks & Partcipation tab.
- Filter the student list by student status (Journals) or marking status.
- Select the student to view their entries and discussion analytics if available.

- Students with accommodations will show the accommodations flag.
- Navigate to the next student or use the drop-down menu to select a different group.
- Add replies/comments to leave feedback throughout the student work, or add overall feedback using the feedback icon.
- Add marks into the pill button. Post marks indidvually to make the marks and feedback visible to students. You can also mark all submissions, and then select Post all marks from the Gradebook to release all grades in one action.