How to access Feedback Studio to mark a Turnitin submission online
Viewing your Turnitin LTI inbox
This section will show you how to view a list of papers that have been submitted to your Turnitin LTI assignment.
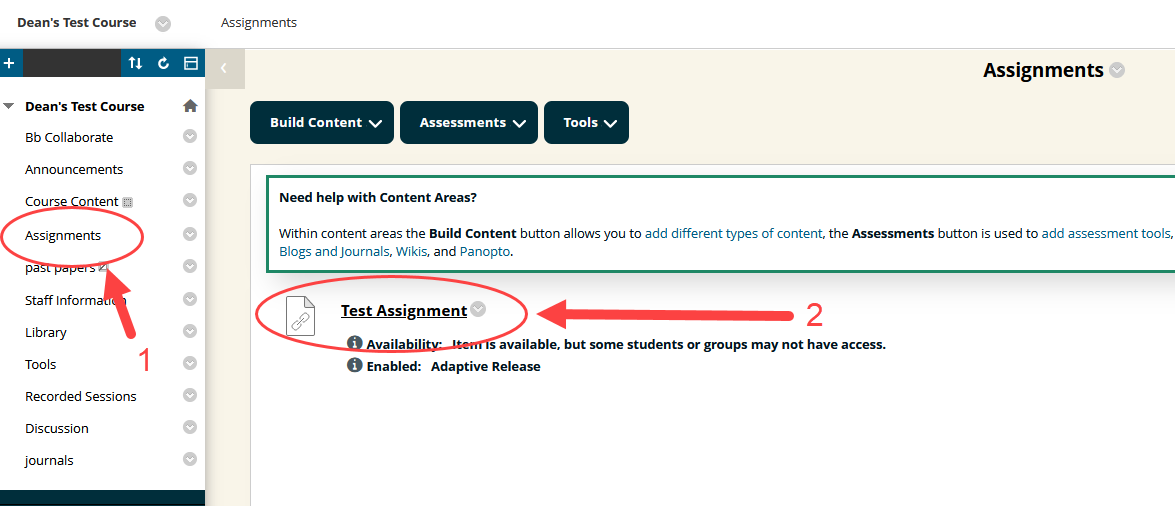
- Navigate to the content area where your assignment is located (1) and click the assignment name (2) to load the inbox.
Viewing a submission

- Once the inbox has loaded you will see a list of submissions, If your assignment is set to anonymous you will not see the students’ names. You can reveal individual names but will not be able to anonymise them again.
- You can open a paper by clicking on the Paper Title, the Grade or Pen icon, or the Similarity score. If a paper has been marked the pen icon will be replaced with the grade given. You can also click on the grade to open the paper.
Feedback Studio Marking Overview
Go to the Turnitin Assignment Inbox to open a paper
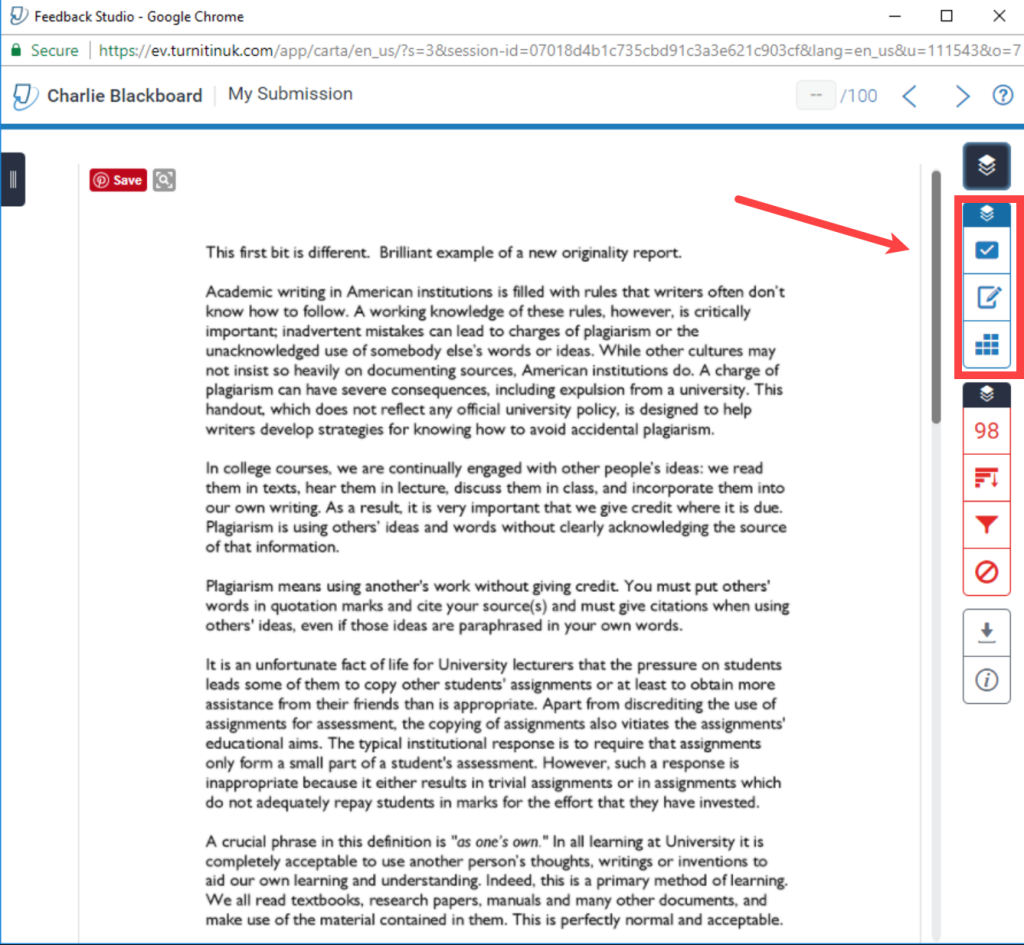
- When opened papers appear in the feedback studio view. The blue buttons in the side panel denote the online marking tools.
QuickMarks Button
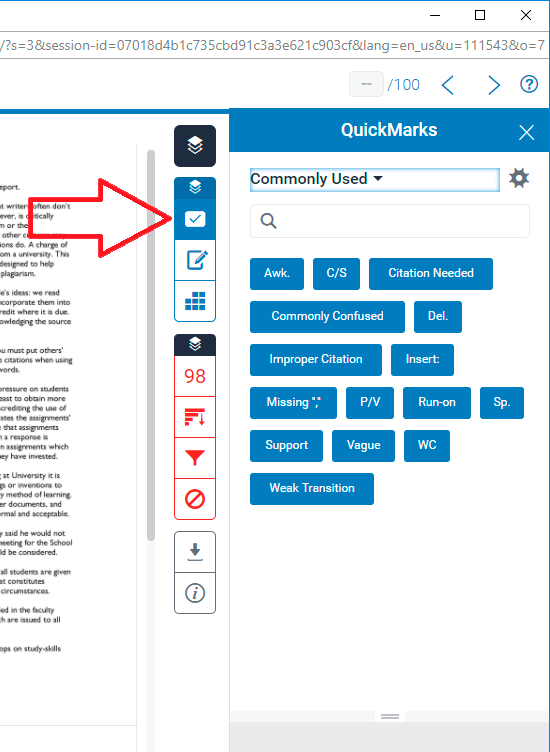
- The QuickMarks button will show you your QuickMarks pane, where you can select QuickMarks, or move between different QuickMark sets.
Feedback Summary Button
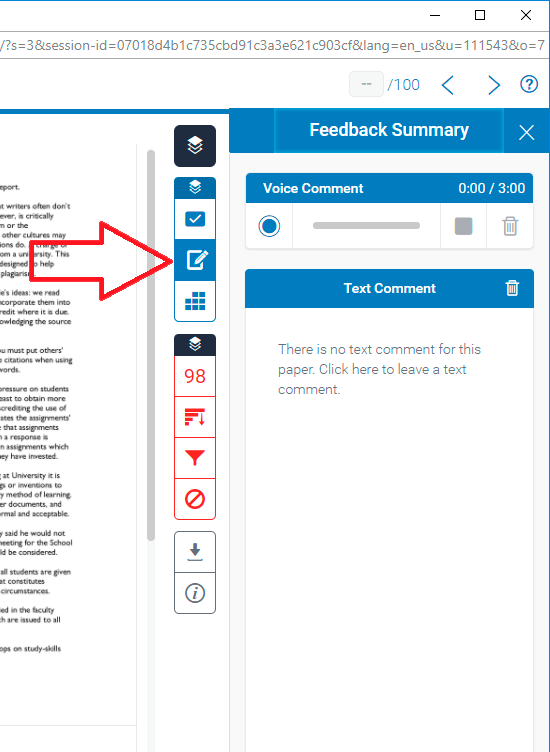
- The Feedback Summary button will take you to the section of Feedback Studio where you can add and edit general comments and voice comments. This area is helpful for providing overall feedback relevant to the submission.
Rubrics and Forms Button
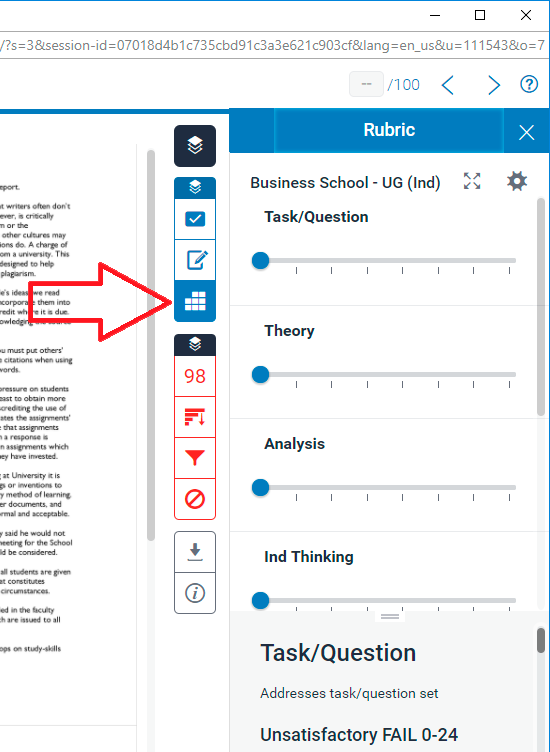
- The rubric/forms button will display the rubric or grading form which is currently attached to your assignment (but only if you’ve attached one to the assignment).
Adding General Comments to a Turnitin submission using Feedback Studio
Go to the Turnitin Assignment Inbox to open a paper
View / Edit General Comments

- Click on the Feedback Summary button in the side panel.
Add / Edit Comment
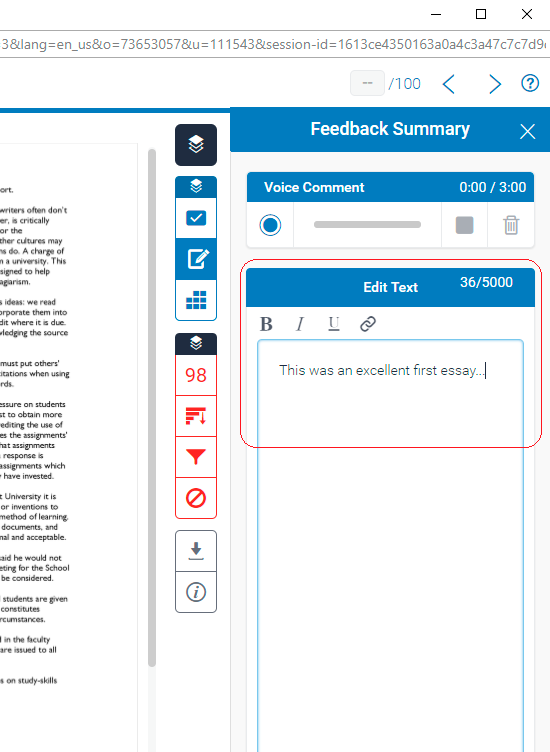
- Click in the large box underneath where it says “Edit Text” in order to add some general comments / feedback for the paper you are marking. The character counter in the top right of this box lets you know how many characters you have left. You can write up to 5000 characters.
- To save the text, click out of the box (e.g. click somewhere else on the page)
Adding a mark to a Turnitin assignment using Feedback Studio
Go to the Turnitin Assignment Inbox to open a paper
Click into grade box to enter a mark / grade

- Click into the score box in the top right hand corner of the screen.
Add a mark and then click elsewhere on screen to save

- Type a number into the score box and then click away from this box. Make sure that you click away from the box (e.g. click somewhere else on the page / submission) before you close this window, as if you close the window whilst the score box is still active (e.g. whilst it has a blue highlight around it), the score won’t be saved.
Adding a voice comment to a Turnitin submission using Feedback Studio
Go to the Turnitin Assignment Inbox to open a paper
View / Edit General Comments

- Click on the Feedback Summary in the side panel, as highlighted in the screenshot above.
Record Comment

- Click on the record icon, as shown in the screenshot above.
Allow Microphone Use


- Select Allow if you see a popup asking for permission to access your camera and microphone. You may also wish to select Remember.
Record Comment

- Record your comment. You should be able to see a blue bar moving up and down when you speak. Once you have recorded your comment (which can be a maximum of 3 minutes per submission), click on the blue stop button.
Check and Save

- Once you have recorded your comment, you will have an opportunity to play it back to yourself to make sure you are happy with it. Once you are happy with the recording, click on the blue save icon. If you are not happy, you can click on the dustbin icon to delete your recording and start again.
Saving Recording
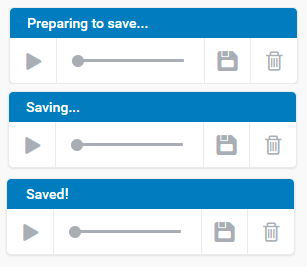
- During the saving process, you may see all of the above messages. Keep in mind that longer recordings will take slightly longer to save than shorter recordings, so if you have recorded three minutes of audio then you may see the ‘Saving…’ message for some time. Once the recording has saved, the Saved! message will pop up briefly.
Adding text comments using Feedback Studio
Go to the Turnitin Assignment Inbox to open a paper
Click to add
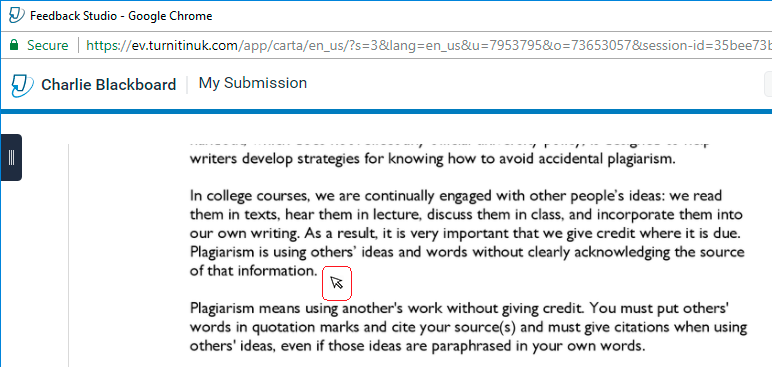
- Click on the area of the document where you’d like to add your comment.
Click on the speech bubble
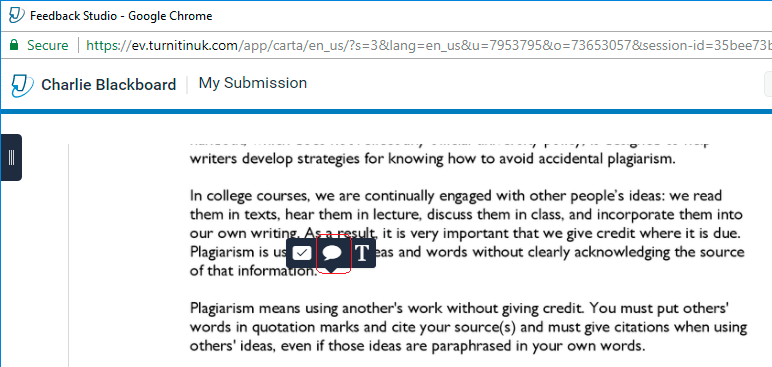
- Click on the speech bubble, indicating you wish to add a standard text comment.
Enter comment
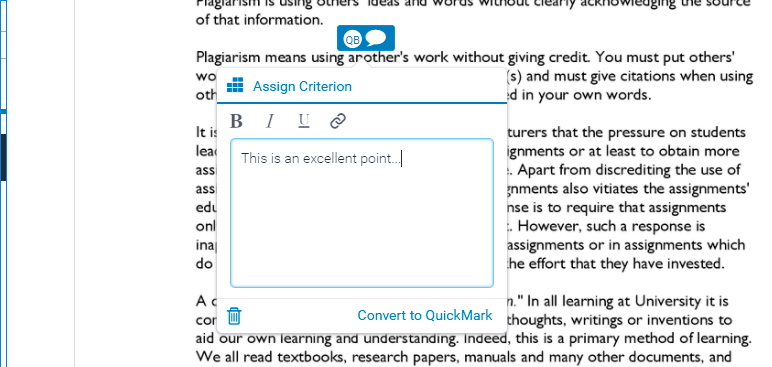
- Using the text box, add your comment. Once you have done this, click away from the text comment popup (anywhere else on screen) to save your comment. If you wish to edit your comment, you should simply click on the comment again within the paper.
Save as Quickmark
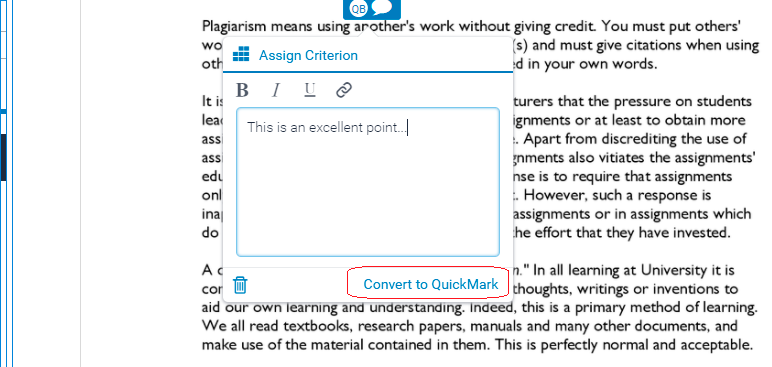
- If you are using the same manually typed comment many times, you may wish to save it as a new QuickMark. To do this, click on Convert to QuickMark.
- You can now edit your comment. Note that there is also an option to save this comment as a new QuickMark. You might wish to do this if the comment you have entered is one you intend to use regularly. You can do this by clicking on Save as new QuickMark.
Save as Quickmark
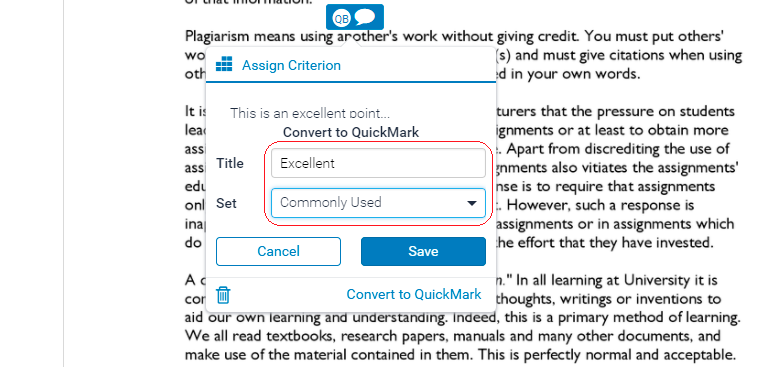
- Give your new QuickMark a title and use the drop down menu to select the QuickMark set you wish to add your QuickMark to. Once you have done this, click on Save. Note that once you have saved a comment as a QuickMark you cannot edit it directly through the comment in the paper.
Adding a QuickMark using Feedback Studio
Go to the Turnitin Assignment Inbox to open a paper
QuickMarks Button

- The selected paper will be opened in the Feedback Studio view. The blue buttons in the side panel denote the online marking tools.
- If the side panel is hidden, click on the QuickMarks button, as shown above. This will show you your QuickMarks pane, where you can select QuickMarks, or move between different QuickMark sets.
Commenting on highlighted text in Feedback Studio
Go to the Turnitin Assignment Inbox to open a paper
Highlight Text
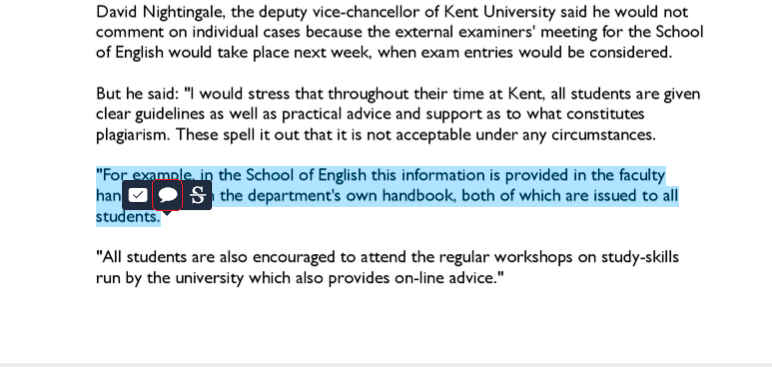
- Click and drag over the text you wish to highlight. You should see a popup containing 3 buttons. Click on the bubble comment icon in order to add a text comment. *Note that you no longer need to use the side panel to add comments to highlighted text – you should just use the little pop up menu.*
Add Comment
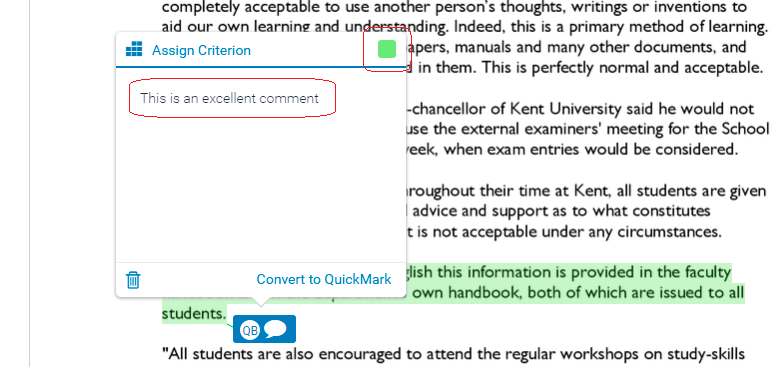
- Type your comment into the text box. Note that if you want to you can change the colour of the highlighter. This can be useful to differentiate between different sections of text. Once you have entered your comment and chosen the highlighter colour, click away from the comment popup in order to save what you have written.
Comment Added
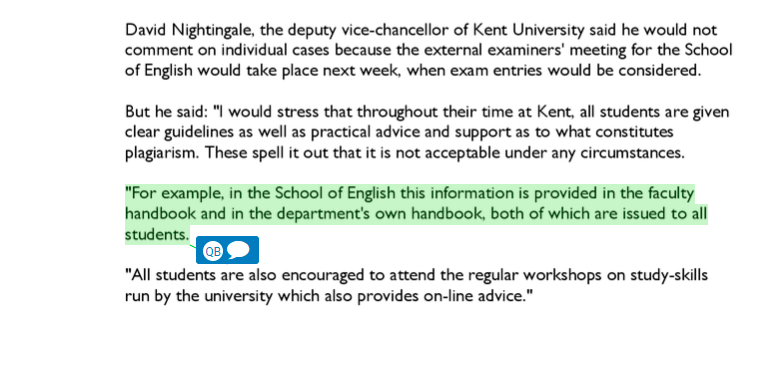
- You should now see a blue comment icon along with your highlighted text, signifying that the comment has been added to the paper. Click on this icon to see your comment.
Add a QuickMark
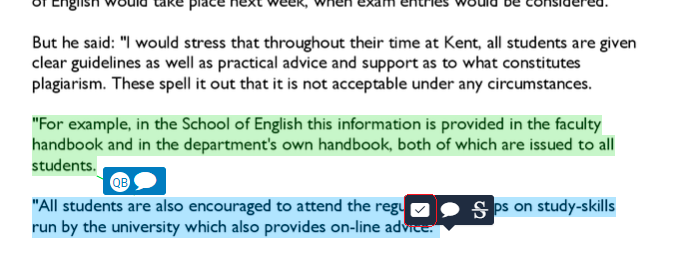
- If you want to, you can select further text in order to add further feedback. In the following example, rather than add a text comment, we will add a QuickMark. Select the text you wish to highlight by clicking and dragging. When you see the three buttons, click on the QuickMark icon. Note that you no longer need to use the side panel to add comments to highlighted text – you should just use the little pop up menu.
Choose QuickMark
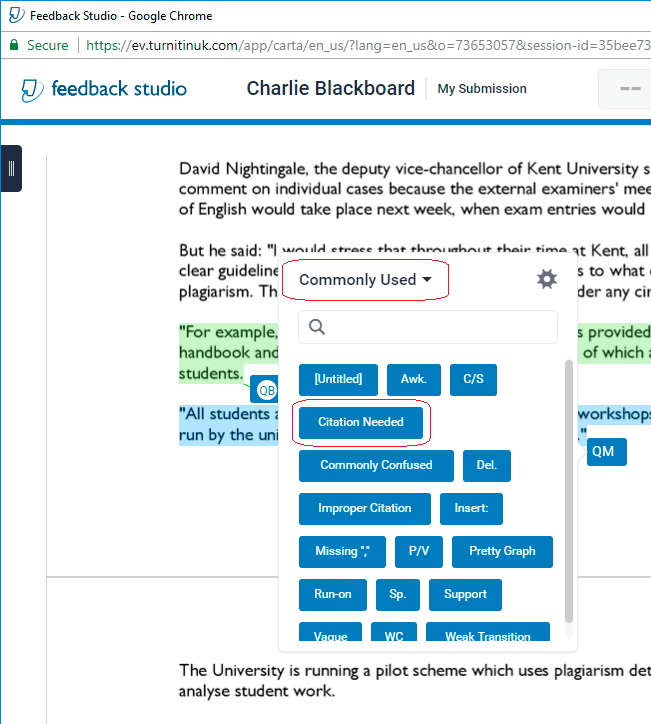
- Select your desired QuickMark. The list of QuickMarks available will depend on which QuickMark set is currently selected. You can choose a different QuickMark set using the button in the top left of the QuickMark popup.
QuickMark Added
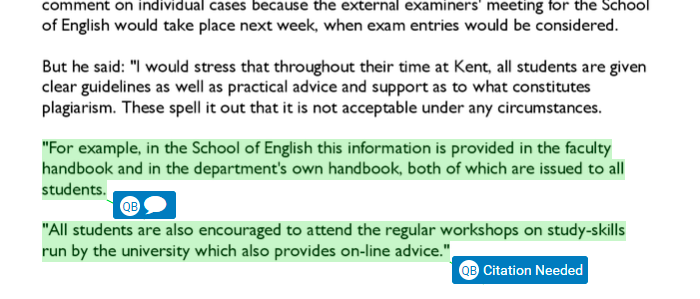
- Your QuickMark comment has been added to the paper.
Add additional comments
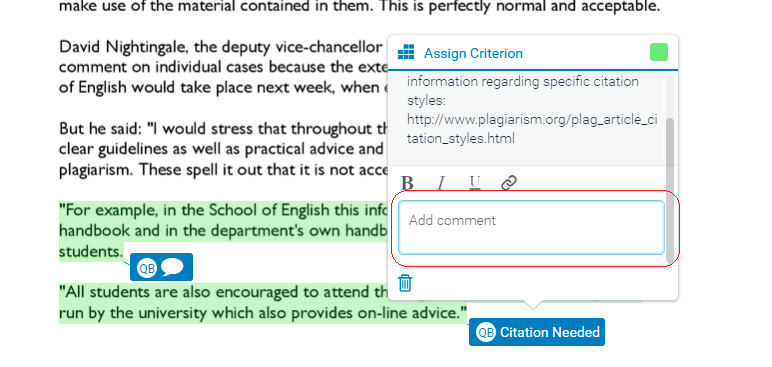
- If you click on your QuickMark, you can edit the highlighting colour, and add additional comments. Additional comments are useful if you want to provide some more tailored feedback for the student to sit alongside the standard QuickMark. Once you have added your additional comment, click away from the popup to save your changes.
Adding an Inline comment using Feedback Studio
Go to the Turnitin Assignment Inbox to open a paper
Select Inline Comment
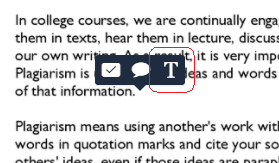
- Click on screen in the location you’d like to leave an Inline Comment. Select the ‘T’ icon, as highlighted in the screenshot above. This is the icon for Inline Comments.
Type Comment

- Type in your inline comment. Once you have finished, use the mouse to click away from the comment. You can edit your comment by clicking on the comment again.
Using different QuickMark sets in Feedback Studio
Go to the Turnitin Assignment Inbox to open a paper
QuickMarks Button

- The selected paper will be opened in the Feedback Studio view. The blue buttons in the side panel denote the online marking tools.
- The QuickMarks button will show you your QuickMarks pane, where you can select QuickMarks, or move between different QuickMark sets.
Current QuickMark set
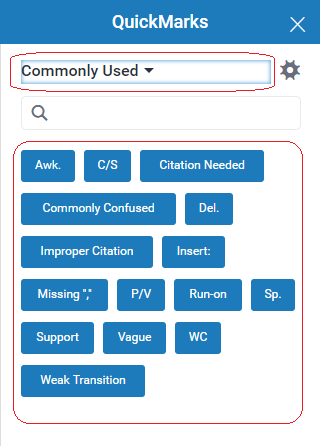
- The current QuickMark set is shown in the drop down menu at the top of the QuickMark area. This usually defaults to ‘Commonly Used’. You can change the currently selected QuickMark set by using this drop-down menu to choose a different set.
- The main pane in the QuickMark side panel displays the QuickMarks in the currently selected set (so in the example above it is showing all of the QuickMarks in the ‘Commonly Used’ set.
- If you click on any of the QuickMarks, the text of the QuickMark will appear in the lower part of the side panel.
