Create a Test or Survey
See Blackboard Help for creating Tests.
Test and Survey Options
See Blackboard Help for Test and Survey options
Deploy the test in a content area
Once you have set up your test or survey you can deploy it into any content area.
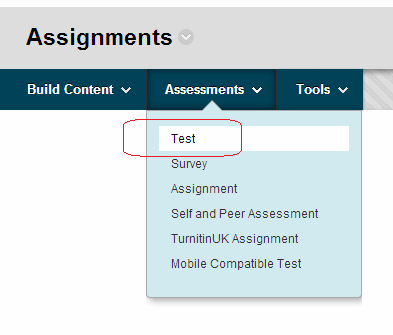
1. Ensure that Edit Mode is On and enter the course content area into which you wish to add your test.
2. Hover your mouse pointer over Create Assessment and click on Test.
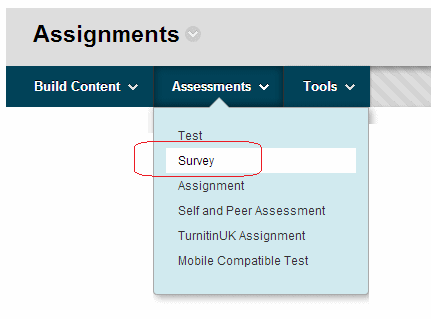
3. Or if you are adding a survey select Survey instead.
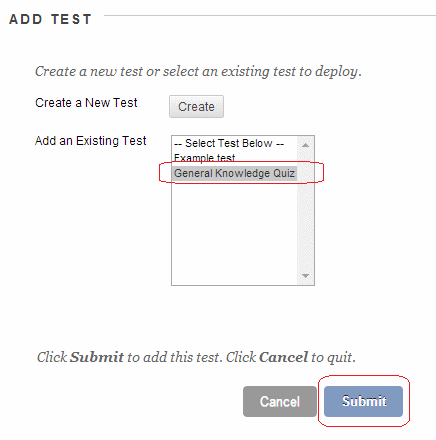
4. You will be presented with a list of tests on the course that you may publish. Choose the test you wish to publish and click on Submit.
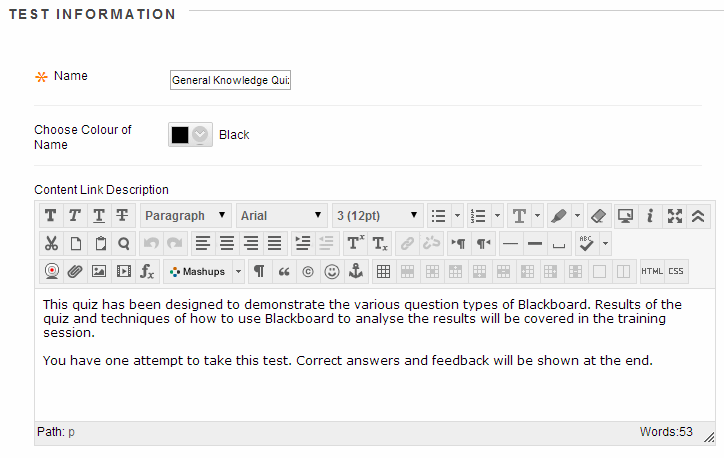
5. In a similar way to adding a content item you will see that you can choose a name, colour and description. These will be completed automatically from the details you entered when you created the test.
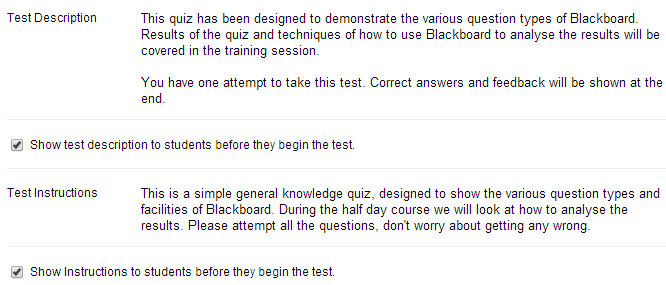
6. Choose whether the description should be shown to students before they take the test. The description is set when creating the test.
7. Choose whether the instructions should be shown to students before they take the test. The instructions are set when creating the test.
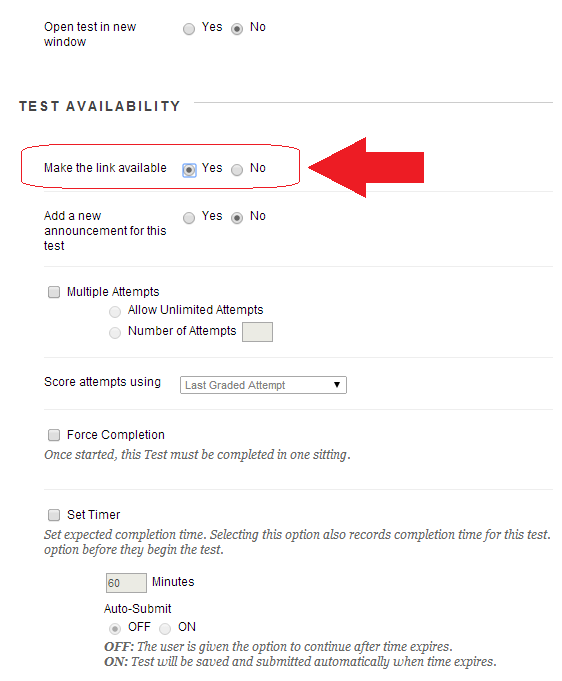
8. If you wish for the quiz / survey to open in a new (separate) window set Open Test in new window to Yes. Select No to have the quiz / survey open within the same window as your regular Blackboard content.
9. Set Make the link available to Yes. This will allow students to take the test. If you do not set this option to Yes, no students will be able to take the test.
10. Set the other options according to your preferences:
Add a new announcement for this Test
Select Yes to create an Announcement about the Test. The Announcement will include the date and state “an Assessment has been made available in [Course area that includes the link to the Assessment]”. This Announcement will appear in the course Announcements area.
Allow multiple attempts
This option allows Students to take the Test multiple times. The status of multiple attempts is displayed to Students at the top of the Assessment. Select Allow unlimited attempts for Students to take the test as many times as they wish. Select Allow X attempts to indicate that a specific number of attempts will be allowed. Fill in the applicable number in the box.
Score attempts using
Note that this option is only configurable if you allow more than one attempt.
Last Graded Attempt
The most recent score will be shown in the grade centre.
Highest Grade
The highest score will be shown in the grade centre.
Lowest Grade
The lowest score will be shown in the grade centre.
First Graded Attempt
The score of the first attempt will be shown in the grade centre.
Average of Graded Attempts
An average of all scores from all attempts will be shown in the grade centre.
Force Completion
If this option is not set, students have the option to save their progress by clicking on a Save button during the test. They may then leave the test and continue taking it at another time. If this option is set to yes (by placing a tick in the box) then students must complete the test when they first attempt it. If a student has a computer or connectivity problem while Force Completion is set to Yes they will not be able to complete the assessment.
Set timer
Select this check box to set a time limit for finishing the Assessment. If selected, select the amount of time to allow for the Test in the hours and minutes boxes below. If a student has a computer or connectivity problem while a timer is running, the timer will continue to run while they have lost access to the test.
Auto Submit
If the timer has been enabled then setting this setting to On will automatically submit the student’s attempt when the timer has run out. If a student has a computer or connectivity problem while completing an assessment with Auto Submit enabled, they may find that their attempt is automatically submitted while they had lost access to it.
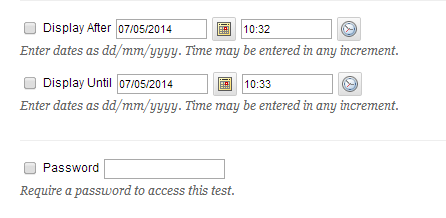
11. The next set of options are described below:
Display After
Select the date and time that this assessment will be available to Students by using the date and time area or by clicking the calendar icon and selecting the date and time.
Display Until
Click the Display Until check box to stop displaying the link on a specific date. Select the date and time for this to occur in the date and time area or by clicking the calendar icon and selecting the date and time.
Set Password
Select this check box to require a password for Students to access this assessment. If this check box is selected, enter a password in the field below. Students must have this password in order to access the assessment.
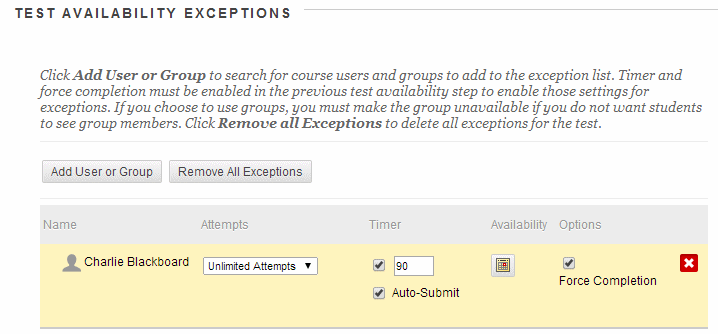
12. If you wish for certain students or groups to have longer time limits or for the test to be available to them for longer you can add exceptions. These can be made on a per user or per group level.
Exceptions can be made for:
Number of attempts
Time given to take the test
Auto submit on or off
Test availability e.g. start date and end date.
Whether force completion should be enabled or disabled for that particular student or group.
To add a user or group click on the Add User or Group button and make your selection. You may then apply the settings as shown in the screenshot above.
Exceptions do not account for the due date. If you set a due date you can not extend this for certain groups or students by using an exception.
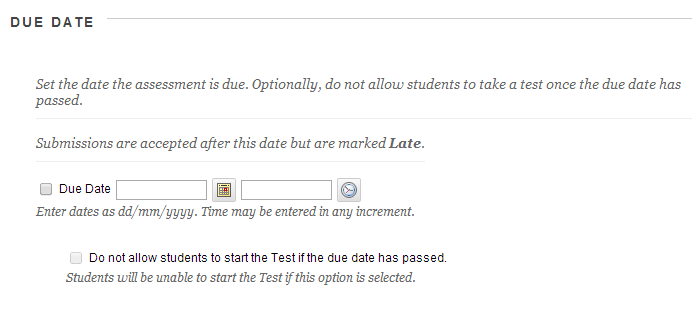
13. If you wish to you may set a Due Date by which the test should be taken. If you do not wish for students to be able to take the test after the due date has passed you may tick that option below the due date.
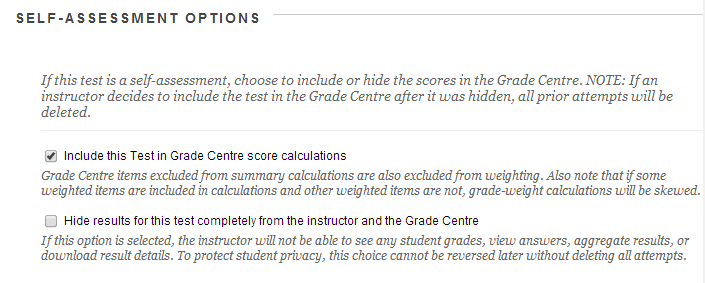
14. Set these options according to your preferences:
Include this Test in Grade Centre score calculations
Select this option to include this test in Grade Centre calculations, such as running total.
Hide results for this test completely from the instructor and the Grade Centre
Select this option to hide this test score in the Grade Centre. If selected, this item behaves like a survey. The display in the Grade Centre will read Complete / Incomplete and N/A or zero appears on the grade details pages. If this item is checked, scores will never be recorded in the Grade Centre, and the instructor cannot see any responses. Students will see scores when the test is submitted but the results are not stored and cannot be seen by the instructor.
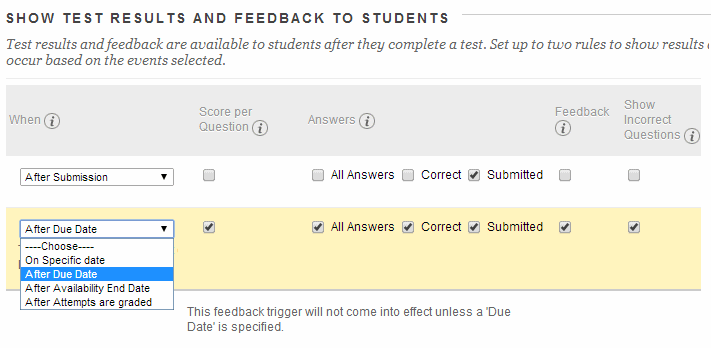
15. Decide what feedback should be shown to students.
When:
Choose at what point you would like feedback to be given to students. If you wish you can choose two “when” points. In this way you could tell students their score immediately after they submitted their answers, but then allow the detailed feedback and correct answers to be shown after the due date has passed.
The possible options here are:
After Submission
Immediately after the student has submitted their answers.
One-time View
Shown only once to students after they have submitted their answers, cannot be seen again.
On Specific Date
Choose a specific date.
After Due Date
After the due date, which must have been set above.
After Availability and End Date
After the availability period has ended, which must have been set above.
After Attempts are Graded
Useful if you have some free text answers in your quiz which will not be marked by Blackboard automatically.
Score per question
Shows the final score out of points possible to students.
All Answers
Shows all answer options for certain question types such as Multiple Choice.
Correct
Shows the correct answers.
Submitted
Shows all the student’s submitted answers.
Feedback
Shows instructor created feedback messages for each question. These must have been entered when the questions were created.
Show Incorrect Questions
Shows the questions the student answered incorrectly or partially incorrectly.
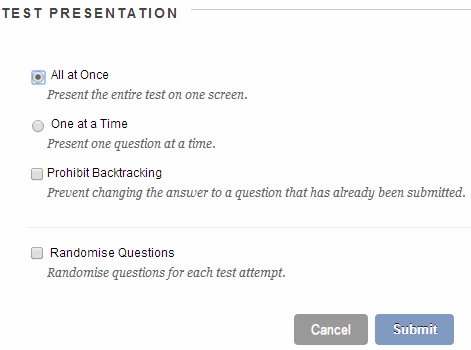
16. Choose how the test should be presented to students
All at Once
Select this option to present the entire assessment on one screen to the Student.
Question By Question
Select this option to display one question at a time. Students will be given navigation tools to move between questions.
Prohibit Backtracking
Select this option to prevent Students from returning to questions they have already answered. This only applies when Question by Question presentation is used.
Randomise Questions
Select this option to display questions in a random order each time the assessment is taken.
17. If you wish to later make the test unavailable so that students may no longer take it, set Do you want to make the link visible to No. (See slide 6.)
Rolling over Blackboard Tests
If you want to copy a Blackboard Test to another course, use the Course Copy (Rollover) tool.
Ensure to select only “Tests, Surveys and Pools” from Course Materials to be copied.
Once complete, your Blackboard Test questions will be available in the destination course under “Tests, Surveys and Pools” in the control panel. Deploy the Test as usual.
