
Login to submit.assignments
The URL for the submit site is as follows
https://submit.assignments.soton.ac.uk/
Log in with your University log on credentials. More information can be found here.
How to find your assignment
Upon logging in, you will be directed to the “Upcoming/Open” tab of the “My Assignments” page, where you will find a table displaying all the assignments assigned to you that are currently open, possible to re-submit to and have not yet reached their submission deadline.
You can find the assignment you need to submit to by referring to the module code, assignment title, and submission date.
The Assignment Overview page
On the My Assignments page, select the assignment title in the Assignment column of the Open Assignments table to open the Assignment Overview page.
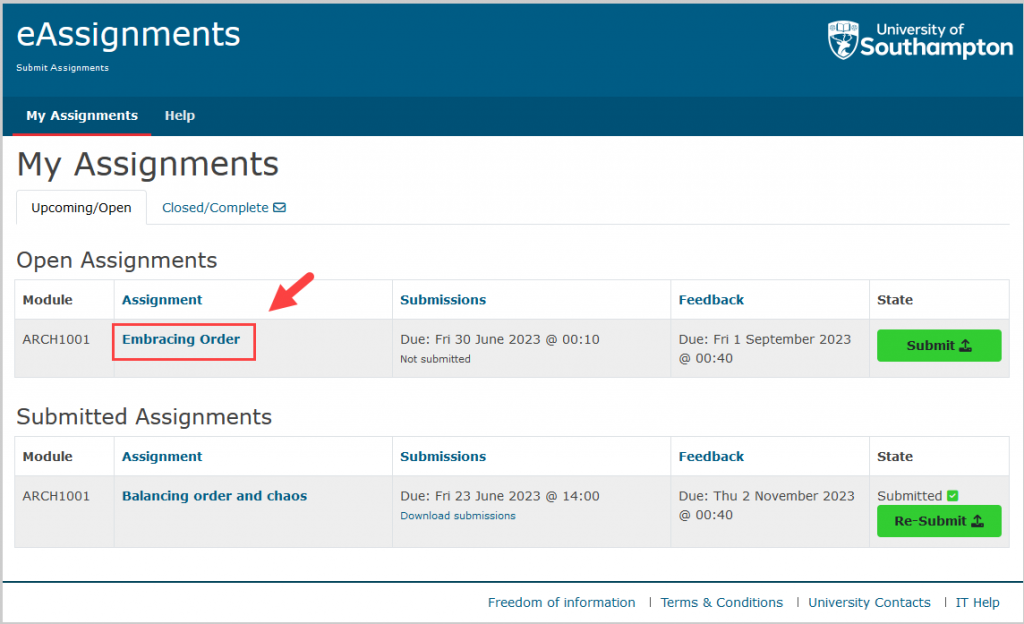
On the My Assignments page, select the assignment title in the Assignment column to open the Assignment Overview page.
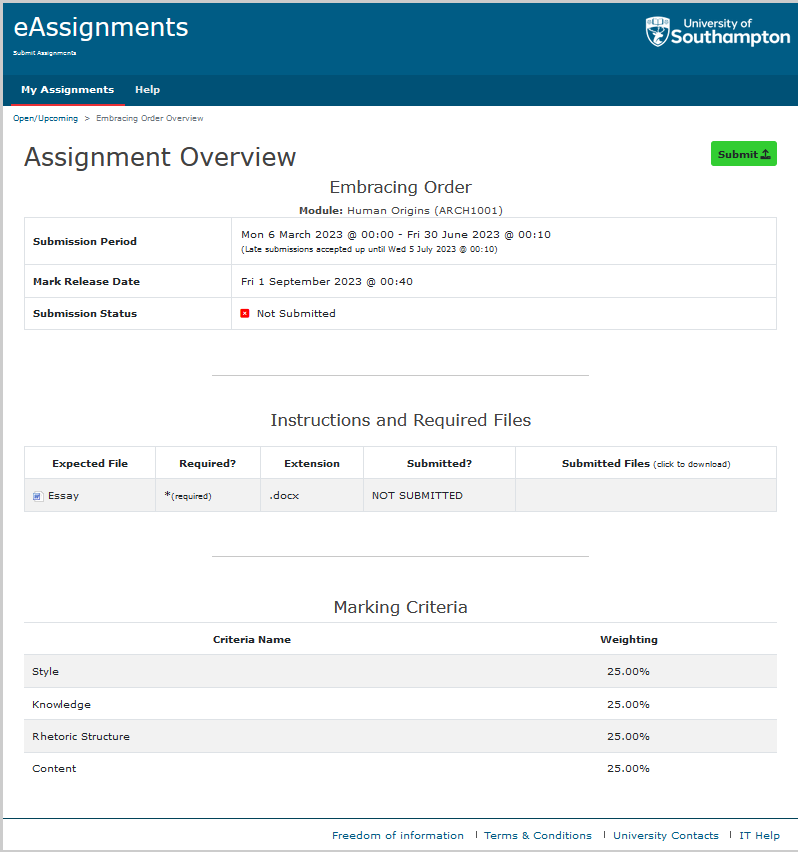
The Assignment Overview page contains all information needed to complete the assessment. This includes:
- the submission period and deadline
- the mark release date
- the current submission status (for example, Not Submitted or Submitted)
- any instructions provided by the lecturer
- details of the files that must be uploaded, including whether they are required and the permitted file types
- any pre-submission or post-submission questions
- the marking criteria and weightings used for assessment
To begin your submission, select the Submit button located near the top right of the Assignment Overview page.
After selecting Submit, you will be taken to the submission process where you can upload the required file(s) and complete any additional steps before submitting your work.
How to submit in eAssignments
Start Your Submission
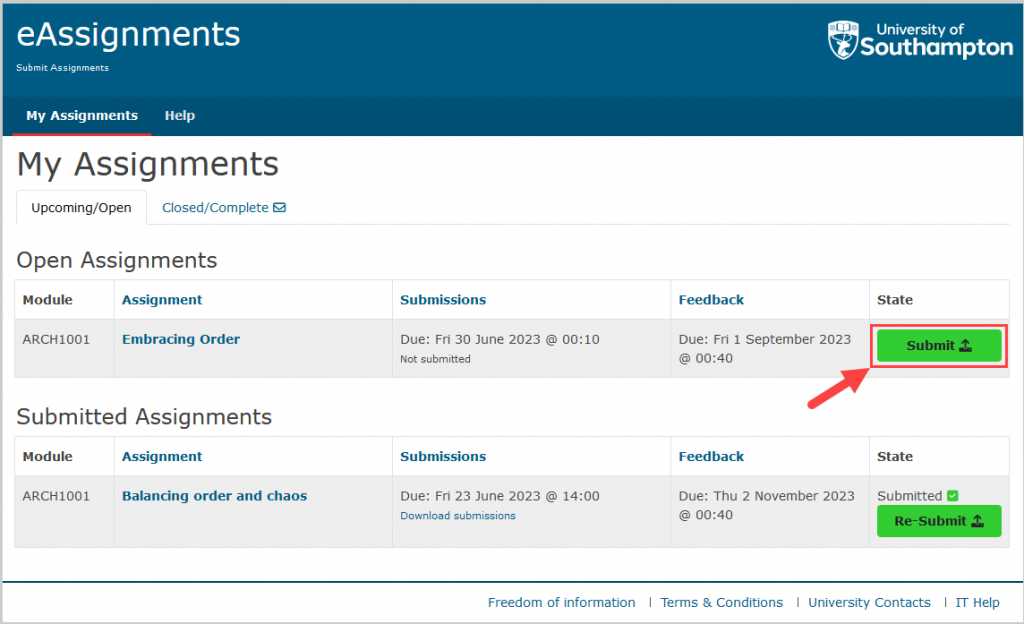
On the My Assignments page, select the Upcoming/Open tab. Find the assignment you want to submit in the Open Assignments table, then select the Submit button in the State column.
Alternatively, select the assignment title to open the Assignment overview page, then select the Submit button near the top of the page.
Selecting Submit starts the submission process.
Confirm the Declaration
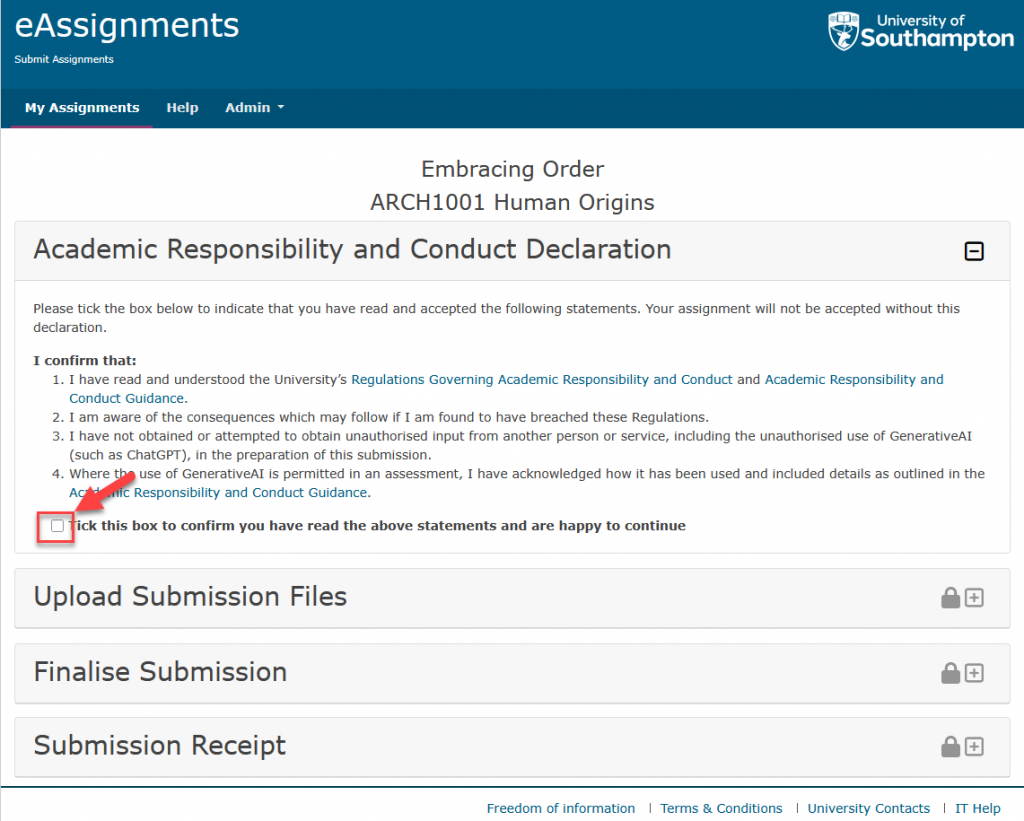
Read the Academic Responsibility and Conduct Declaration and the statements listed within it. To confirm that you have read and accepted the statements, select the checkbox beneath the declaration.
You must select this checkbox before you can continue with your submission. Once selected, you can proceed to the Upload Submission Files section.
Upload Your Submission Files
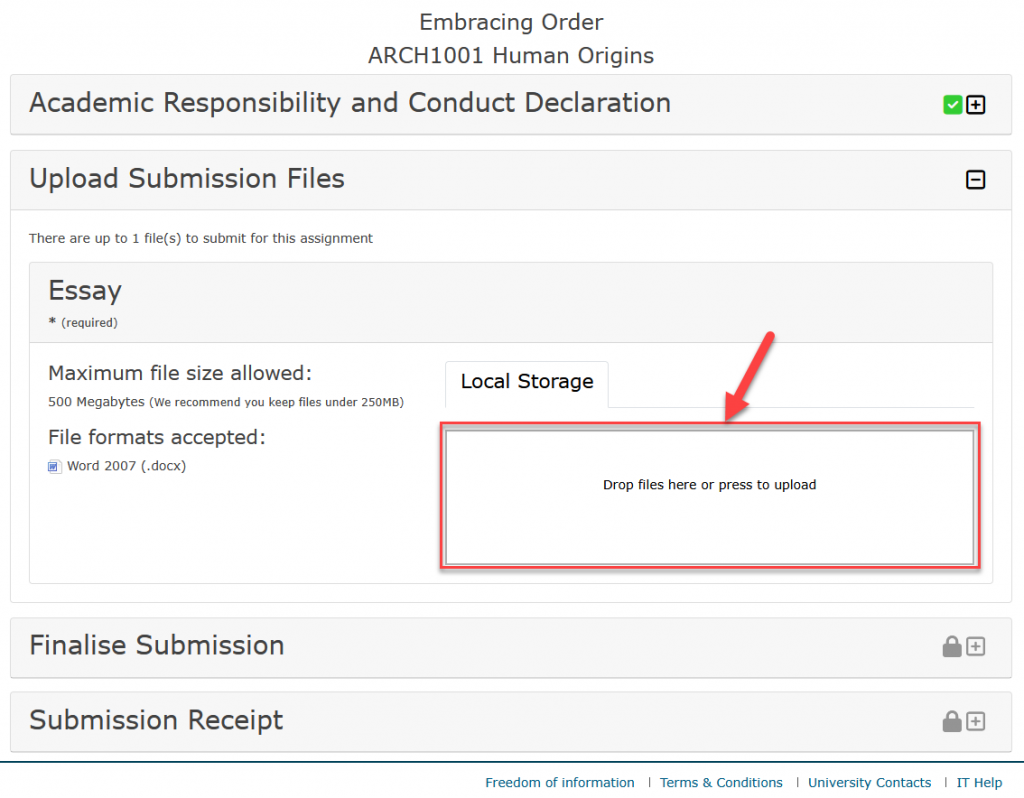
Open the Upload Submission Files section. For each file you are required to submit, the page displays the accepted file format and the maximum permitted file size.
To add a file, use the “Drop files here or press to upload” area. You can either drag and drop your file into this area or select the area to browse for and choose a file from your device.
If your assignment requires more than one file, each file will have its own upload area.
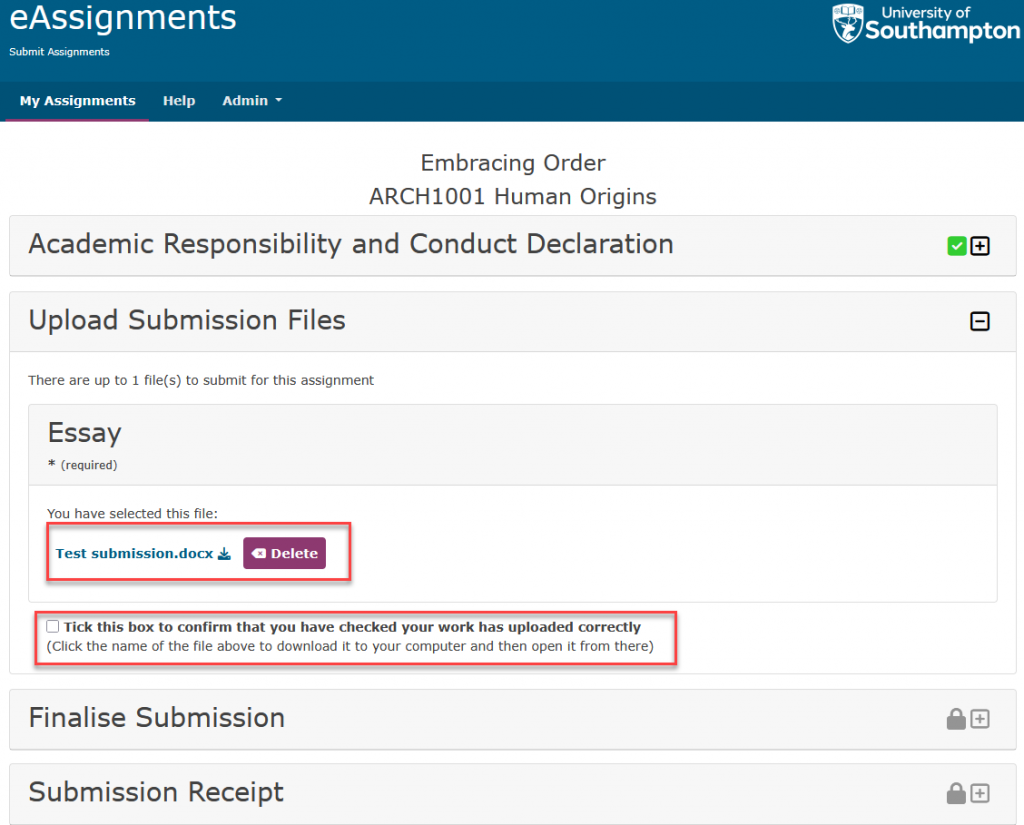
After your file has uploaded, its file name will appear in the Upload Submission Files section.
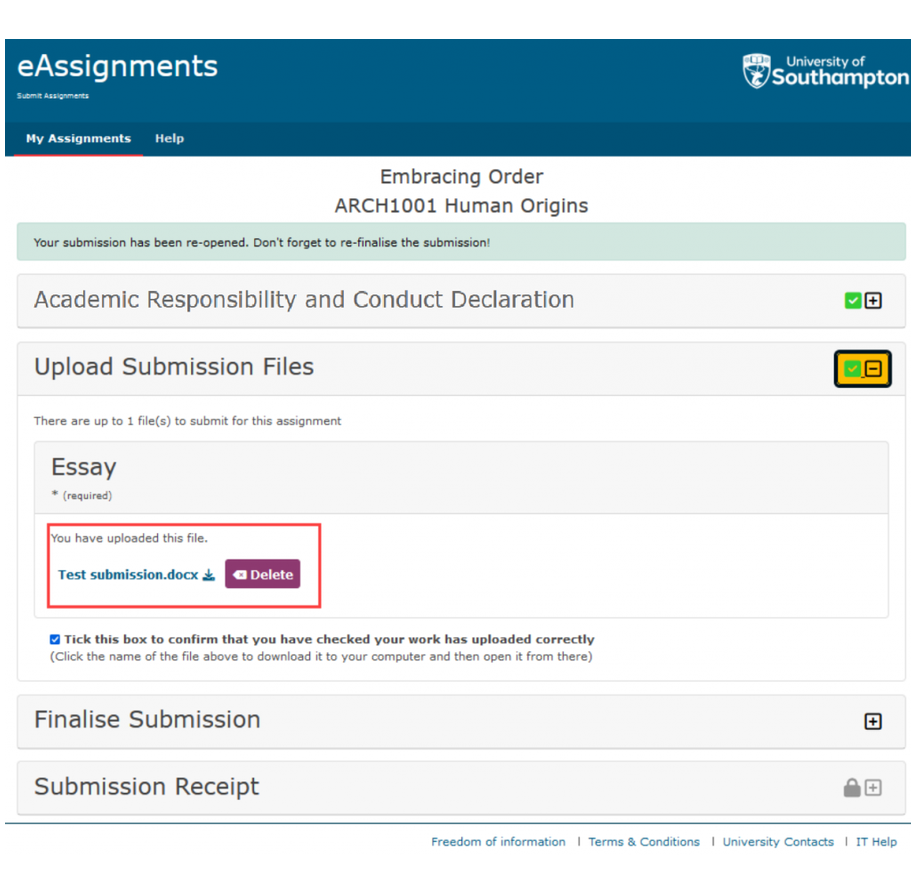
Select the file name to download a copy and check that the correct file has been uploaded. If you have uploaded the wrong file, select Delete, then upload the correct file.
Once you have checked that your file has uploaded correctly, select the checkbox below the uploaded file to confirm this.
After selecting the checkbox, you can continue to the Finalise Submission stage.
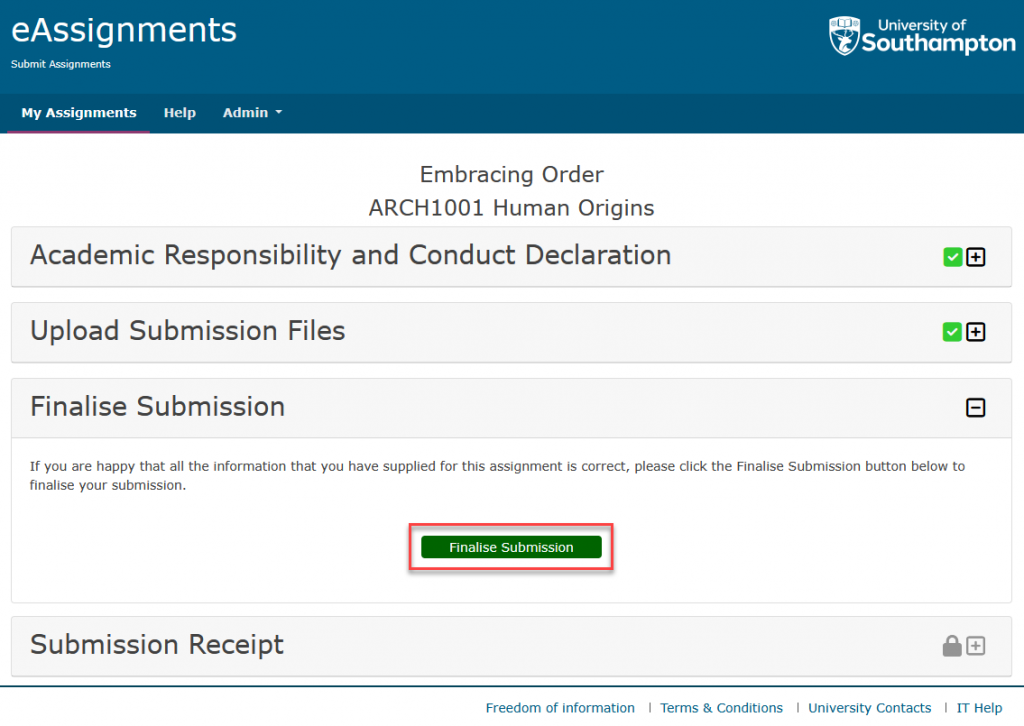
Before finalising your submission, you can return to the previous sections to review your declaration and uploaded files. Select the plus (+) button next to a section to open it.
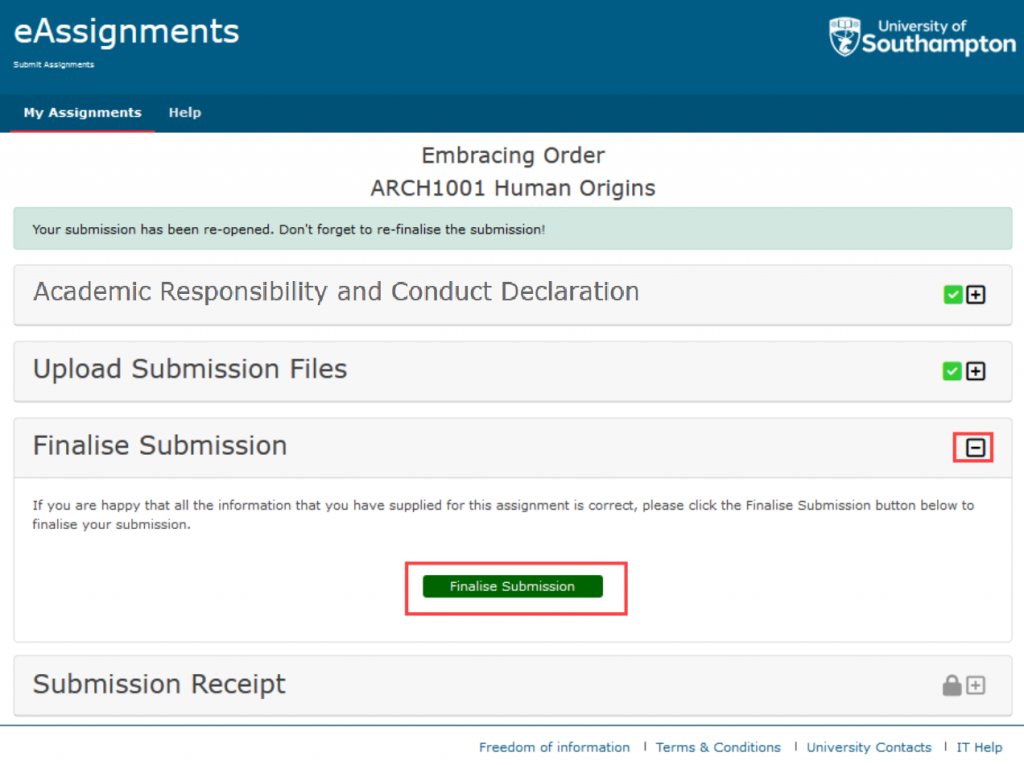
When you are satisfied that your uploaded files and submission details are correct, open the Finalise Submission section and select the Finalise Submission button.
Selecting Finalise Submission completes your submission and takes you to the Submission Receipt stage.
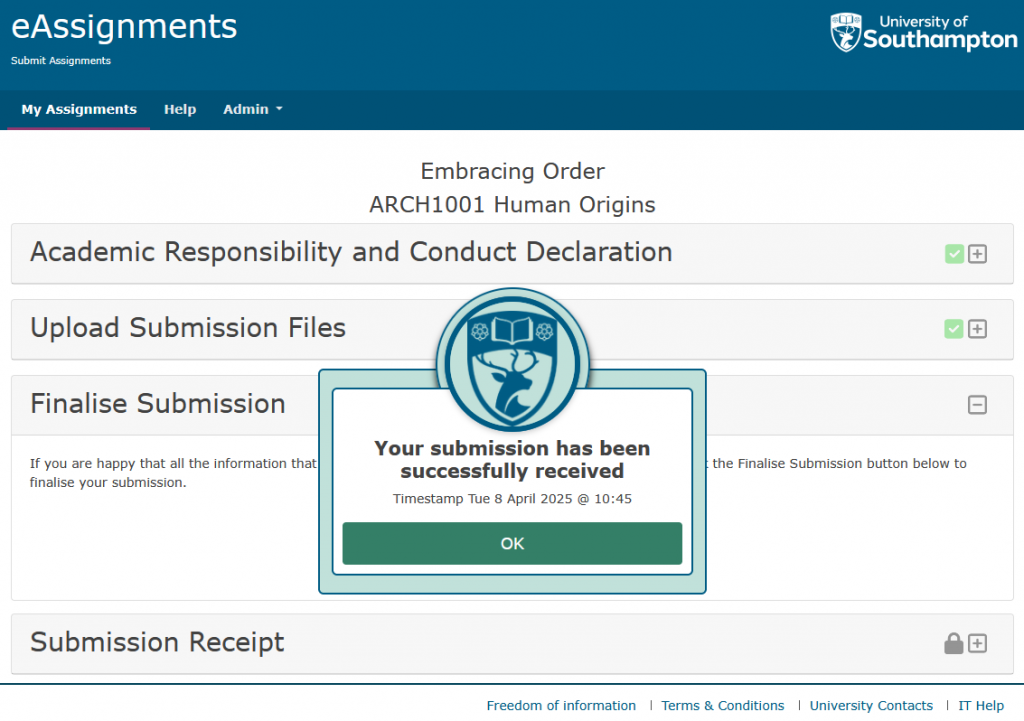
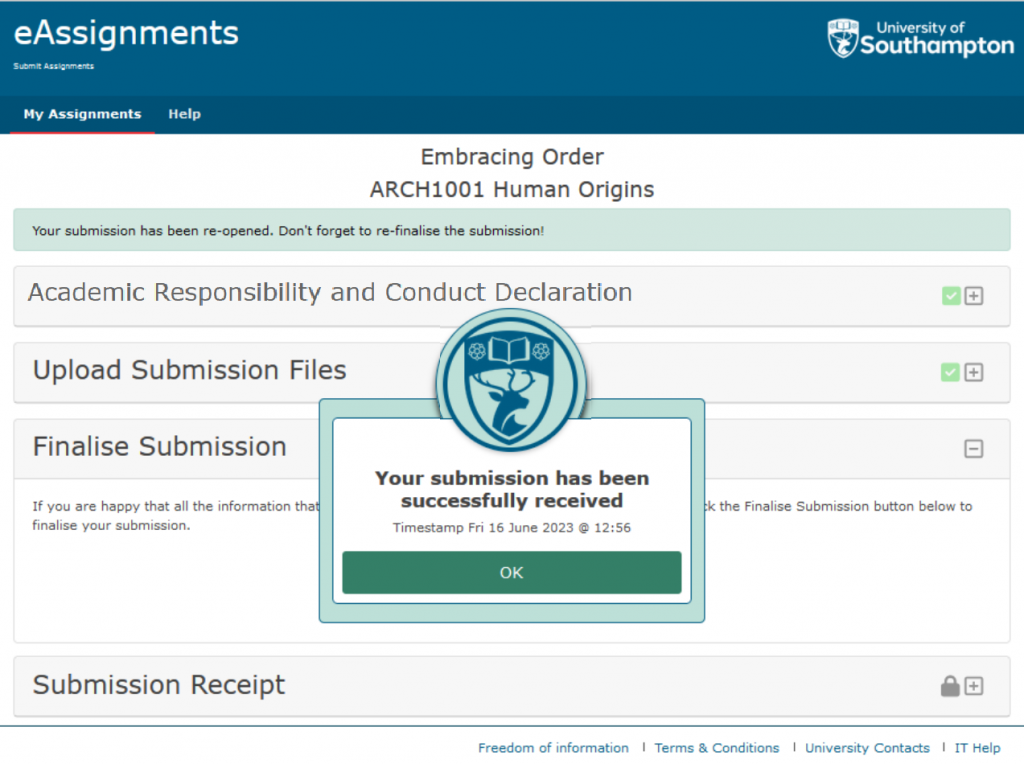
After you finalise your submission, a confirmation message will appear stating that your submission has been successfully received. The message also shows the date and time of submission.
Select OK to close the confirmation message and continue to the Submission Receipt section.
The Submission Receipt confirms that your submission was successful and displays your submission receipt number and time of submission. Keep this information as confirmation that your work has been submitted successfully.
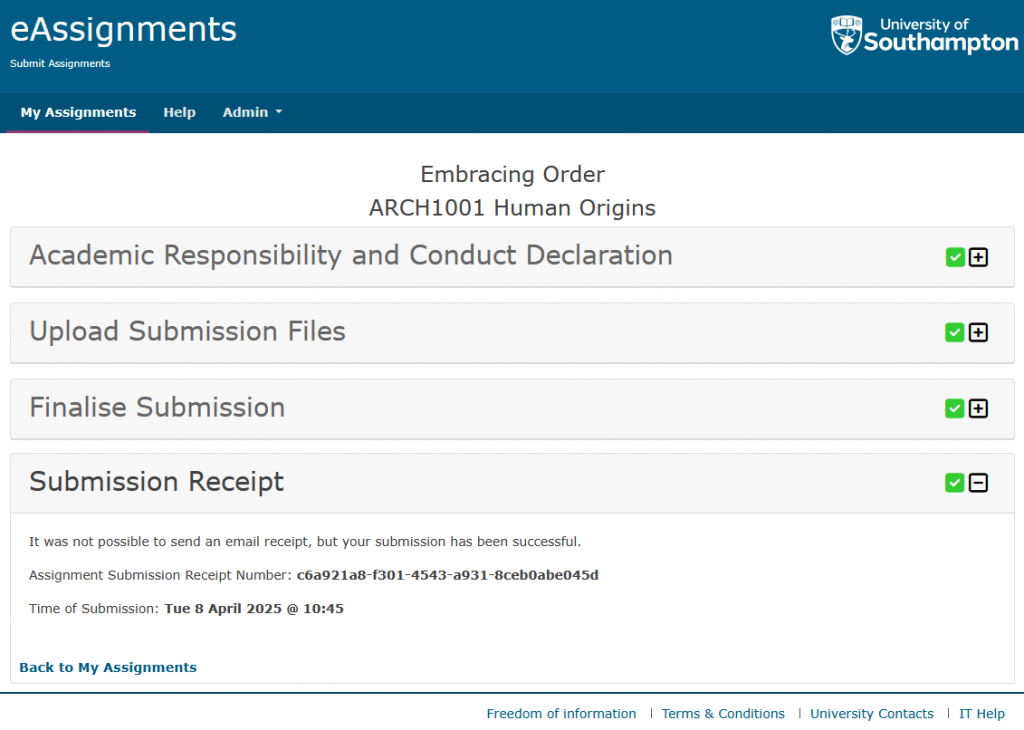
A confirmation email may also be sent. Check the Submission Receipt section for confirmation of your submission, even if an email receipt cannot be sent.
How to re-submit in eAssignments
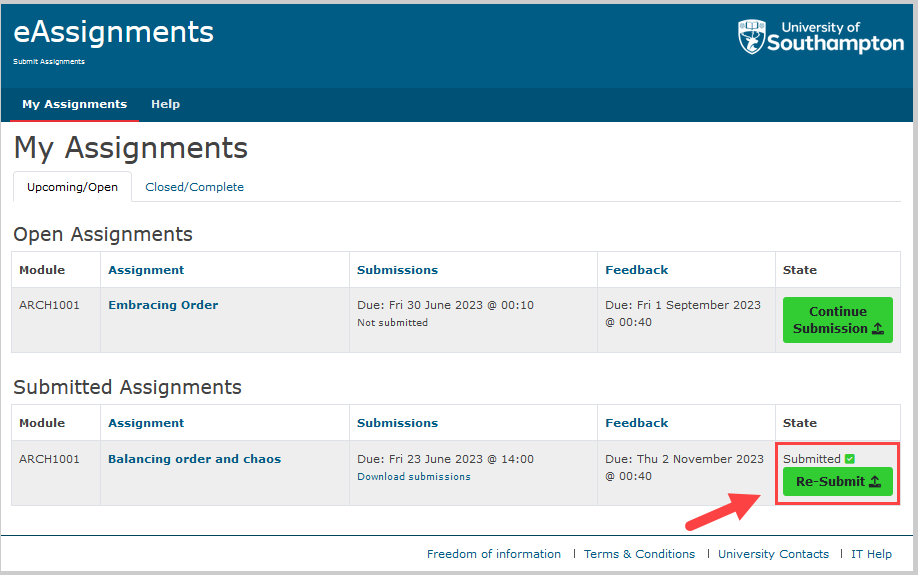
On the My Assignments page, select the Upcoming/Open tab. Assignments you have already submitted that are still available for re-submission are listed under Submitted Assignments.
Find the assignment you want to re-submit and select the Re-Submit button in the State column.
Selecting Re-Submit starts the re-submission process for that assignment.
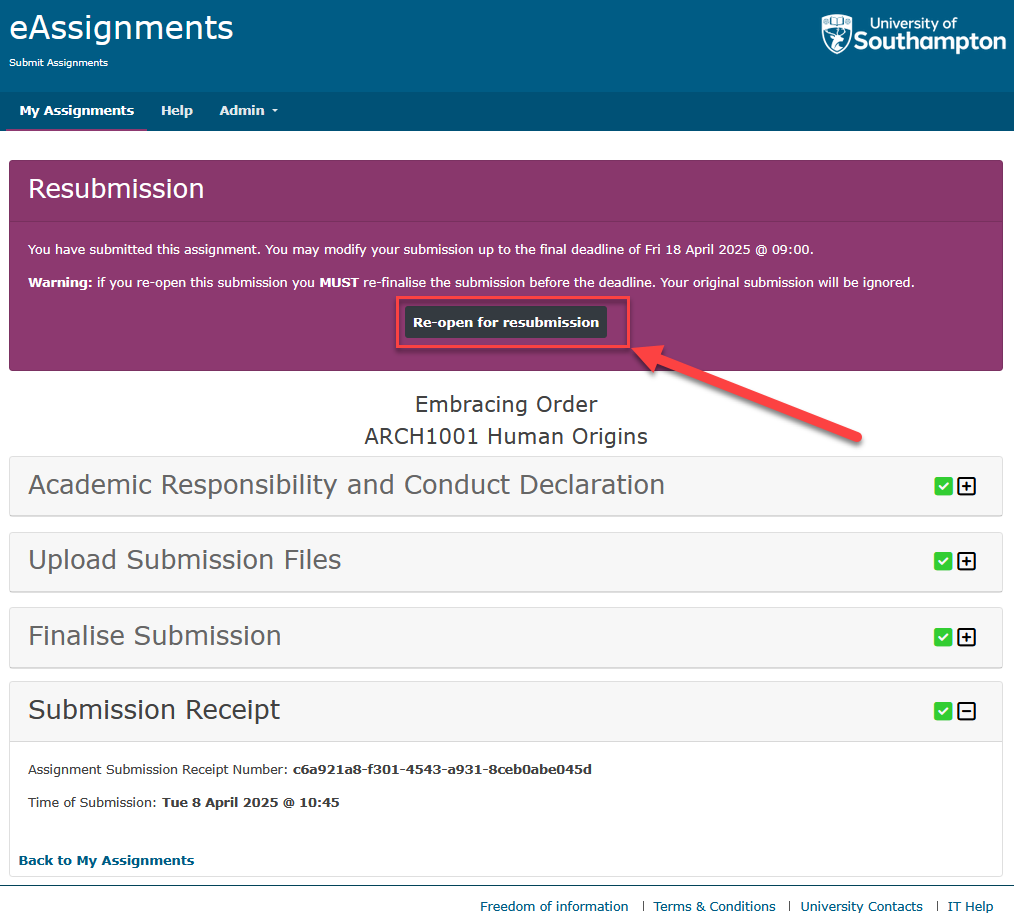
Re-Open for Resubmission
Select Re-open for resubmission to reopen your existing submission and make changes.
Update Your Submission
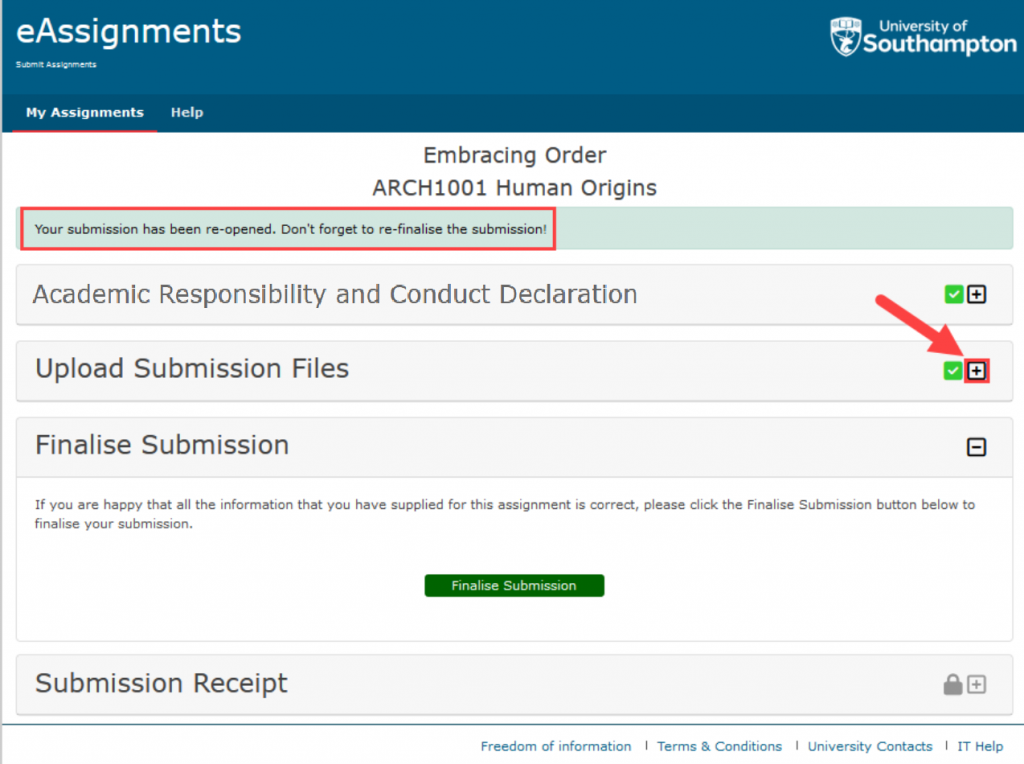
After reopening your submission, a message confirms that your submission has been re-opened and must be re-finalised.
To change your submitted files, open the Upload Submission Files section by selecting the plus (+) button next to it. You can then review and replace the files in your submission.
To replace a file, select Delete next to the file you want to remove, then upload the replacement file.
Re-finalise Your Submission
When you’re ready, select the plus (+) button next to Finalise Submission to open the section. Select Finalise Submission to complete your re-submission.
After you re-finalise your submission, a confirmation message will show that your submission has been successfully received. Select OK to continue to the Submission Receipt.
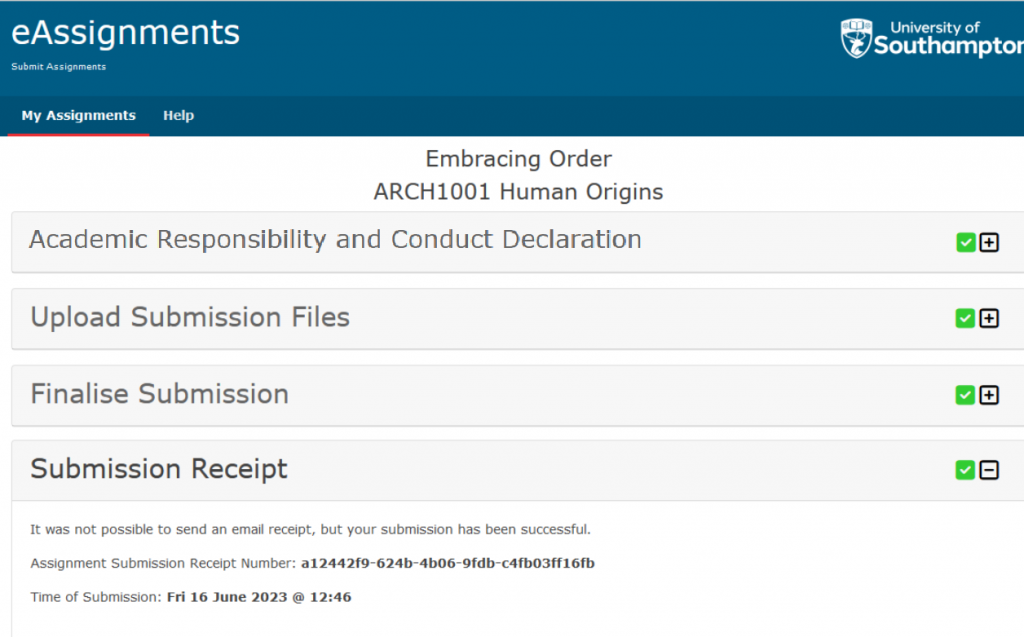
A confirmation email may also be sent. Check the Submission Receipt section for confirmation of your submission, even if an email receipt cannot be sent.